Make your workflow more efficient with MacsyZonesOrganize your windows with ease
All the features
You've always waited for
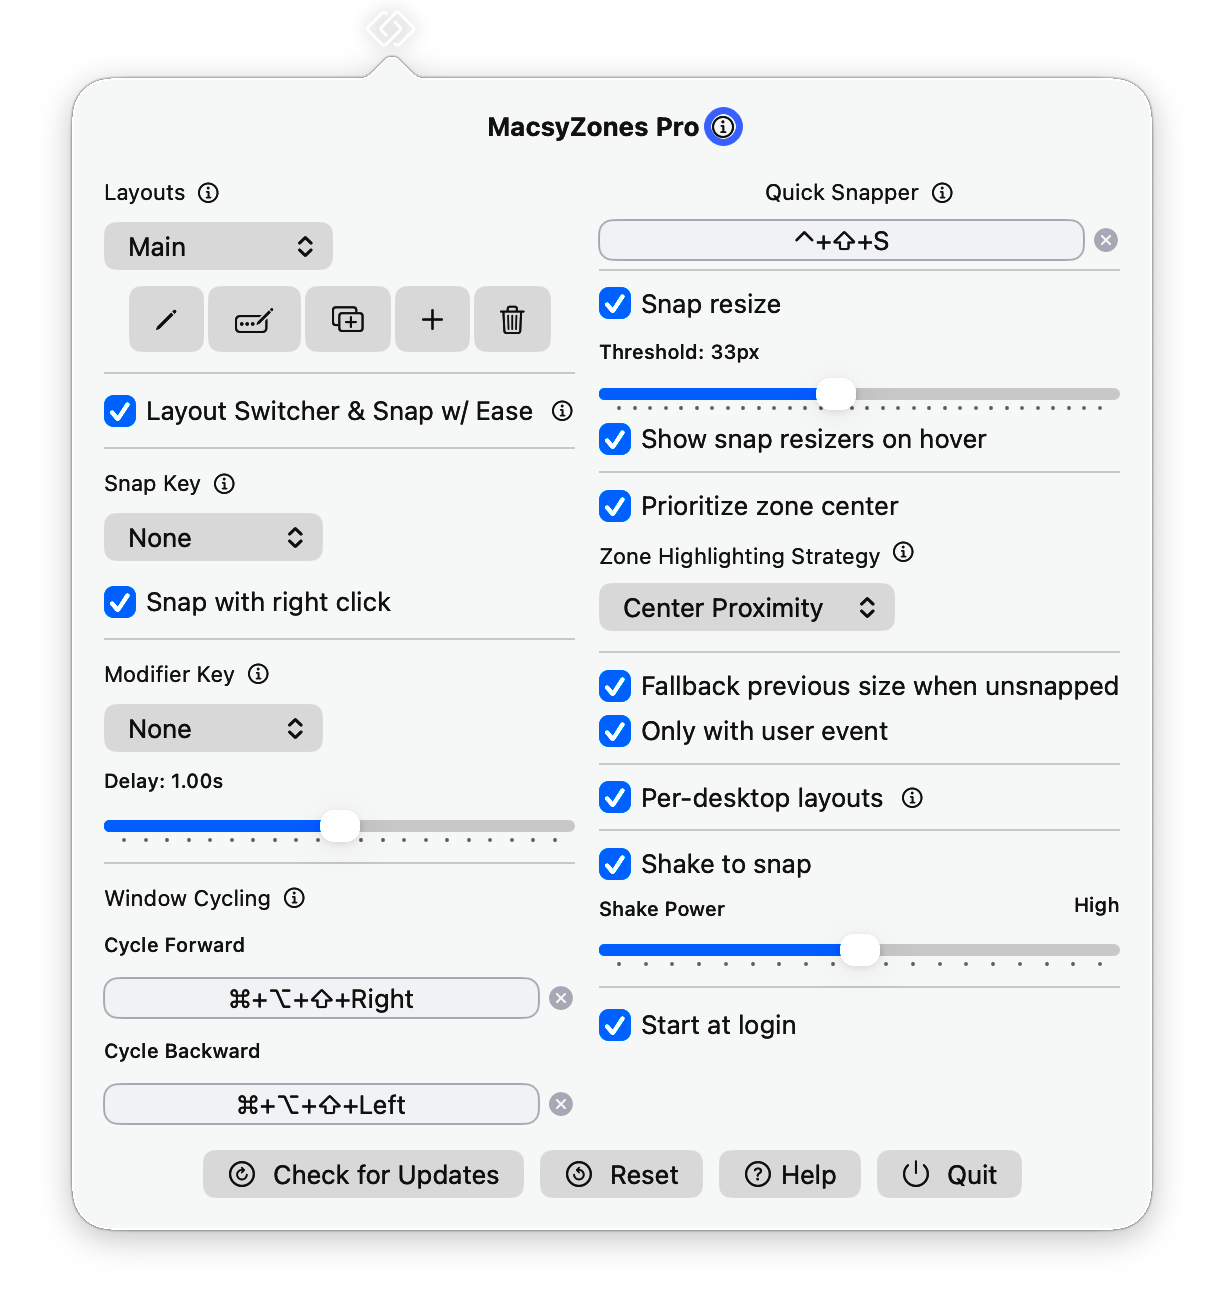
Create layouts with your own design, snap windows into zones, and switch between layouts seamlessly.

Simplicity but
Innovative features
Powerful Features
Discover what makes MacsyZones the ultimate window management tool for macOS

Welcome to MacsyZones
Organize your workspace efficiently with powerful snap zones, boost your productivity with keyboard shortcuts, and customize layouts to match your workflow.
MacsyZones has unique features that makes lives better. I'm always working to make it better. You can buy MacsyZones to support me. Also you can donate to me any amount you want.
Let's get started! 🚀
Snapping a Window
1. Hold your Snap Key (default: Shift) while dragging a window
2. Your zones will appear on the screen
3. Move your window over the desired zone
4. Release to snap the window into place
💡 Tip: You can also use Snap with right click (enabled default) to snap windows without holding the Snap Key.
Adding and Designing Layouts
1. Click the pencil icon in the menu bar to enter edit mode
2. Add zones by clicking the + button
3. Resize and position zones by dragging their edges
4. Create new layouts for different workflows
📝 Note: MacsyZones remembers your preferred layout for each screen and workspace combination. You can select which layout you want to prefer while you are on a screen and workspace.
Shake to Snap
1. Grab a window by clicking and holding its title bar
2. Shake your mouse or trackpad rapidly
3. Zones will appear automatically
4. Move and release to snap
⚡ Tip: Adjust shake sensitivity in settings to match your preference. This feature is perfect for trackpad users!
Snap Resize
1. Move your mouse pointer to somewhere center of two zones' edges meet or hold your Modifier Key (default: Control) for a moment
2. Snap resizers appear between zones
3. Drag a window edge close to a snap resizer
4. The edge snaps to the resizer for perfect alignment
✨ Feature: Enable 'Show snap resizers on hover' in settings for instant visibility without holding the Modifier Key.
Quick Snapper
1. Use the Quick Snap Shortcut (default: Control+Shift+S) to toggle Quick Snapper mode
2. Use arrow keys ↑ / ↓ to navigate between zones and ← / → navigate between layouts
3. Press the zone number (1-9) to snap selected window to the zone
4. Press Delete to unsnap selected window
5. Press Enter to get it done
🚀 Efficiency: Quick Snapper is designed for users who prefer keyboard-centric workflows, enabling rapid window management without leaving the keyboard. You can use it as snapper, layout switcher and quick window switcher.
Grid Layouts
1. Hold your Snap Key while dragging a window
2. A grid overlay appears on your screen
3. Draw a rectangle on the grid to define the snap area
4. Release to snap the window into the drawn region
🎯 Flexibility: Grid Layouts gives adjustable density of grids and snap your windows with ease.
Latest Version: 3.0.4 (31 May 2026)
MacsyZones is open source 🥳
Starbrew install --cask macsyzonesPerfect for CLI lovers! 💻
MacsyZones is also sold on my (Meowing Cat's) Patreon page if you want to support.
You can also donate me on my Patreon page.
You can download it free from here.
When you buy MacsyZones, I'll send you a license key to your email address.
When you buy to donate MacsyZones, you'll have the same MacsyZones, just "Pro" in its name.
Meet the team behind MacsyZones
Yes, the team is only a cat 🐈. It is good to buy/donate MacsyZones! 😍 When you buy, your MacsyZones will be named as "MacsyZones Pro" (the only difference 🥳).

Meowing Cat
Meowing Cat is a cat who paws code. He is the creator of MacsyZones.
Cat is also the creator of famous open source debugger GDBFrontend and recently React﹤Kitten﹥ a new fully React-ish programmable web Desktop Environment / Window Manager, truly customizable and feature-rich.
Frequently Asked Questions
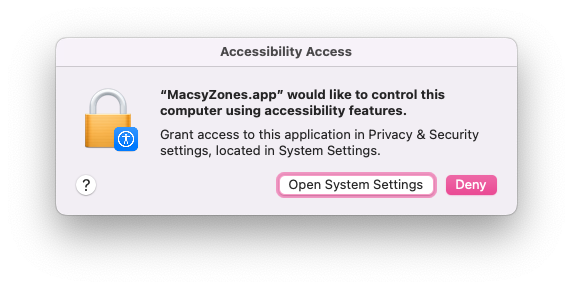
macOS is not letting me use the app because of Accessibility Permission 🙀
MacsyZones needs accessibility settings for its functionalities, go to System Preferences, Security & Privacy, and click on Accessibility and check the checkbox next to MacsyZones.
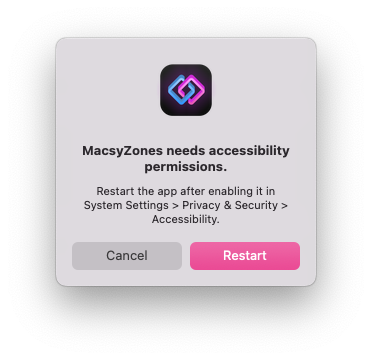
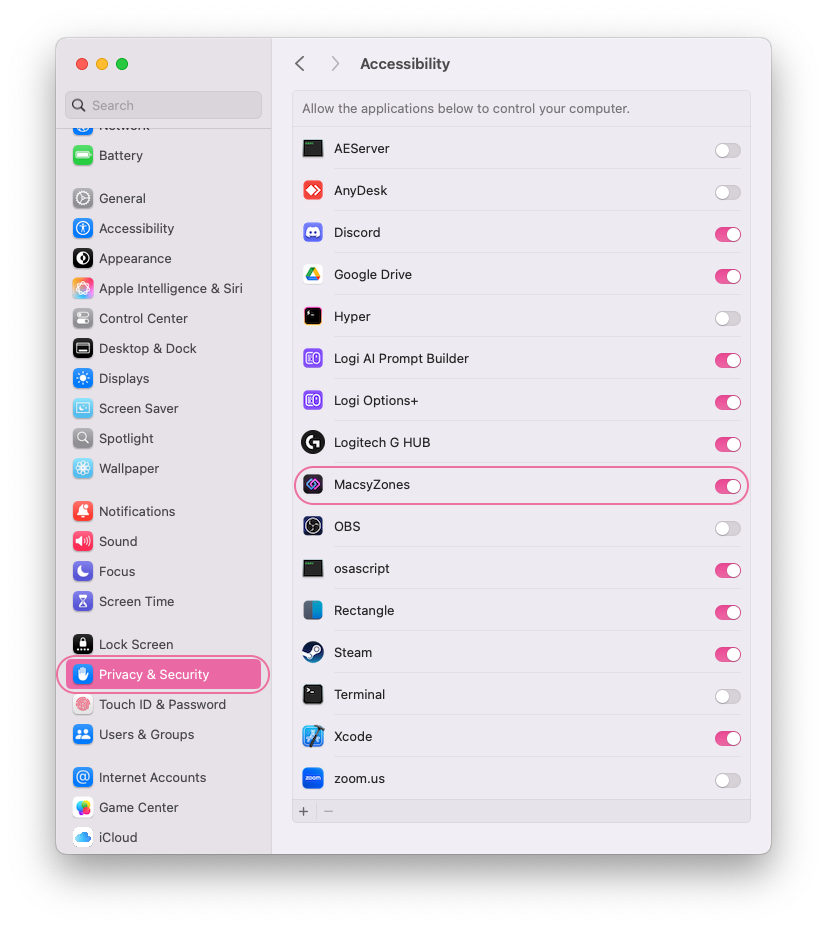
After enabling it, restart MacsyZones and you'll be able to use it without any issues.
If it keeps asking for permission, close MacsyZones, open Terminal app and enter this command:
sudo tccutil reset All MeowingCat.MacsyZonesIs the app stable enough? 🤔
Looks like yes; the app is stable enough. I'm always testing the app on different devices and macOS versions.
However, MacsyZones is just released. If you encounter any issues, please let me know.
It's purrfect but, will you make more amazing features? 😍
Yes! I'm always working on new features and improvements. If you have any suggestions, feel free to contact me.
Known Issues & Troubleshooting 🛠️
Upgrading from MacsyZones 1.3.2 or older
If it keeps asking for Accessibility permission, close MacsyZones, open Terminal app and enter this command:
sudo tccutil reset All MeowingCat.MacsyZonesNotch and macOS menu bar height difference for external monitors
macOS menu bar height is higher on the MacBook screens with a notch than its size on external monitors. This won't cause any problem, but if you want pixel-perfectness, you can create different versions of same layout for MacBook screen and external screens.
Do not place zones in another screen in Layout Editor
In Layout Editor (while editing a layout) don't place a zone to another screen, this is an undefined behavior for MacsyZones' Layout Editor. (It will be avoided in next versions.) You can create different layouts with different zone designs and use them with differently on all of your screens and workspaces (virtual desktop).
MacsyZones will remember and switch your layout preferences when you switch a screen and workspace. 😇I love the app! How can I support you? ❤️
Thank you! You can support me by buying the app and also sharing it with your friends or commmunities.
You can also donate me any amount on my Patreon.
Support on Patreon
patreon.com/evrenselkisilik
Bitcoin
1A3NkkFEMFc2wq74GGRXdzrsEn42Ts1ajm
ETH, USDT/USDC (ERC20)
0xDDD5e5029F4d1CA54461abCF558Cb6dcAD6Df3CB
Monero
8A8HWvGp8d3Qf8Qn1ei97RXPJiQYodvBxLSaPbnLEKAZ2pjnAbmNLn59HNPKirrAmKTfNEfjbobdi33zV1CwDQ7qRLxiZvR
Also check out my other app
QuakeNotch
A Quake-style terminal that lives on your MacBook's notch with Apple Music integration
Lightning-Fast Terminal Experience
QuakeNotch brings the classic Quake-style terminal to your Mac, utilizing the notch area for instant access. Perfect for developers who want speed and style in their workflow.
Quake-Style Access
Instant drop-down terminal
Apple Music
Control music right from terminal
Continuous Development
Regular updates & new features
Beautiful UI
Stunning design & animations
Made with ❤️ by me (Cat). If you love MacsyZones, you'll love QuakeNotch too!